Introduction
The Exchange Administration Center (EAC) is an easy-to-use interface for managing Exchange. However, it enable you to change only a handful of mailbox settings, and you can modify only one mailbox at a time.
For more comprehensive management, you turn to Microsoft PowerShell (or, to be exact, Exchange Management Shell). With the Set-Mailbox cmdlet, you can modify nearly any attribute of a mailbox, including both the common ones (such as name, display name, alias, logon name, title, and company) and the uncommon ones (such as Arbitration, ArbitrationMailbox, AttributesToClear and ArchiveDatabase). The Set-Mailbox cmdlet is available for both on-premises Exchange Server and Exchange Online.
This blog provides a wealth of examples that illustrate how you can use the Set-Mailbox cmdlet to accomplish common mailbox management tasks.
Set-Mailbox Cmdlet: Identity Parameter
The Set-Mailbox cmdlet has dozens of parameters, as detailed here. The key one is the Identity parameter, which you use to specify the mailbox you want to modify. You can use many types of values with this parameter, but the most common ones are:
- Mailbox name
- Email address
- Security Account Manager name (SamAccountName)
- Security Identifier (SID)
- Distinguished Name (DN)
- Globally Unique Identifier (GUID)
Alternatively, you can use a local user object variable to collect multiple objects and use that variable to pass them through the pipeline to the Identity parameter, as we will illustrate in the final example.
Set-Mailbox Cmdlet Examples
The Set-Mailbox cmdlet can be used to update the display name of a mailbox, set up an archive database for a mailbox and more. Examples include:
- Change the Alias of a Mailbox
- Update the Display Name of a Mailbox
- Update the SamAccountName of a Mailbox
- Modify an Arbitration Mailbox
- Specify the Archive Database for a Mailbox
- Specify the Database for a Mailbox
- Set an Archive Quota for a Mailbox
- Set an Archive Warning Quota for a Mailbox
- Set an Internal Forwarding Address for a Mailbox
- Set an External Forwarding Address for a Mailbox
- Control which Mailboxes Forwarded Messages Are Sent to
- Modify Multiple Mailboxes at Once
Change the Alias of a Mailbox
To assign an Exchange alias (also known as a mail nickname) to a mailbox, use the the -Alias parameter. The alias value is used to produce the primary email address (alias@domain.com) when you establish a recipient without specifying an email address.
Only one alias value can be assigned to a recipient. The maximum character length is 64.
An alias should not be confused with a person having several email addresses, known as proxy addresses.
The following cmdlet will update the alias for the user Abbey Crawford to AbbeyCrawford2:
Set-Mailbox -Identity "AbbeyCrawford" -Alias "AbbeyCrawford2"
Update the Display Name of a Mailbox
To update the display name of a mailbox, use the -DisplayName parameter. The display name is shown in the mailbox properties in the Exchange Admin Center, as well as in the address list and in the Outlook email client. The maximum length of the display name attribute is 256 characters. If the display name includes spaces, you must enclose the value in quotation marks (“”).
The following command will update the display name for the AbbeyWarren mailbox to Abbey Eckels:
Set-Mailbox -Identity “AbbeyWarren” -DisplayName “Abbey Eckels”
Update the SamAccountName of a Mailbox
SamAccountName is used as an object identifier in pre-Windows 2000 clients and server operating systems. To change this value, use the -SamAccountName parameter. Note that this parameter is available only for on-premises Exchange Server.
The value can include a maximum of 20 characters. The following are valid characters:
- Letter
- Number
- Space
- Period (.) (however, a period cannot be the final character)
- Exclamation mark (!)
- Hash (#)
- Ampersand (&)
- Percent (%)
- Dash (-)
- Underscore (_)
All unicode characters are acceptable; however, accented characters (such as ö) may cause collisions.
Set-Mailbox -Identity “AbbeyCrawford” -samAccountName abbeyeckels
Modify an Arbitration Mailbox
Exchange 2016 CU8 and later includes seven special mailboxes called arbitration mailboxes, which are used to store certain system data and manage the messaging approval process.
To modify one of these mailboxes, use the -Arbitration parameter. This parameter does not require a value. You can use this parameter only with on-premises Exchange Server.
This parameter should not be used to modify arbitration mailboxes that are used to store audit log settings or data; use the AuditLog or AuxAuditLog switch instead.
Run the following command to re-create the arbitration mailbox, Migration.8f3e7716-2011-43e4-96b1-aba62d229136.
Enable-Mailbox -Identity "Migration.8f3e7716-2011-43e4-96b1-aba62d229136" -ArbitrationThe following command will set the Persisted Capabilities (msExchCapabilityIdentifiers) for the specified arbitration mailbox:
Set-Mailbox -Identity "Migration.8f3e7716-2011-43e4-96b1-aba62d229136" -Arbitration -Management $true -ForceSpecify the Archive Database for a Mailbox
To update the Exchange database that contains the archive associated with a mailbox, use the -ArchiveDatabase parameter. You can use any value that uniquely identifies the database, such as its name, Distinguished Name (DN) or GUID. You can use this parameter only with on-premises Exchange Server.
The following command specifies that the archive associated with the AbbeyCrawford mailbox is the Exchange database called Archive:
Set-Mailbox -Identity “AbbeyCrawford” -ArchiveDatabase Archive
Specify the Database for a Mailbox
To assign a database to a mailbox, use the -Database parameter. You can use any value that uniquely identifies the database, such as its name, Distinguished Name (DN) or GUID. You can use this parameter only with on-premises Exchange Server.
Set-Mailbox -Identity “AbbeyCrawford” -Database Marketing
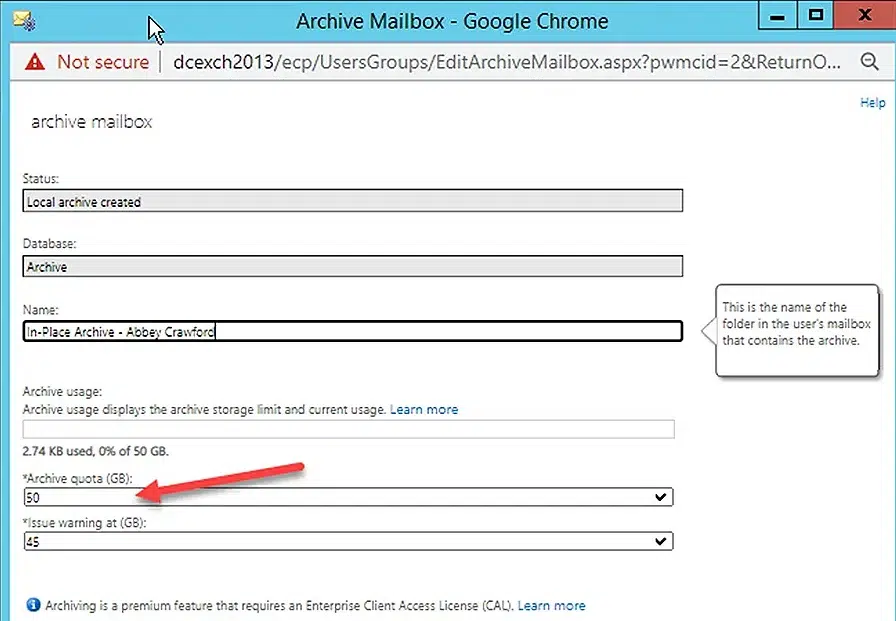
Set an Archive Quota for a Mailbox
To specify the maximum size for an archive mailbox, use the -ArchiveQuota parameter. Once the specified size is reached, the mailbox cannot accept any additional messages. You can use this parameter only with on-premises Exchange Server.
For the value, either specify unlimited or provide a number using one of the following units:
- B (bytes)
- KB (kilobytes)
- MB (megabytes)
- GB (gigabytes)
- TB (terabytes)
Set-Mailbox -Identity “AbbeyCrawford” -ArchiveQuota 50GB
You can check the archive quota for a mailbox in its properties:
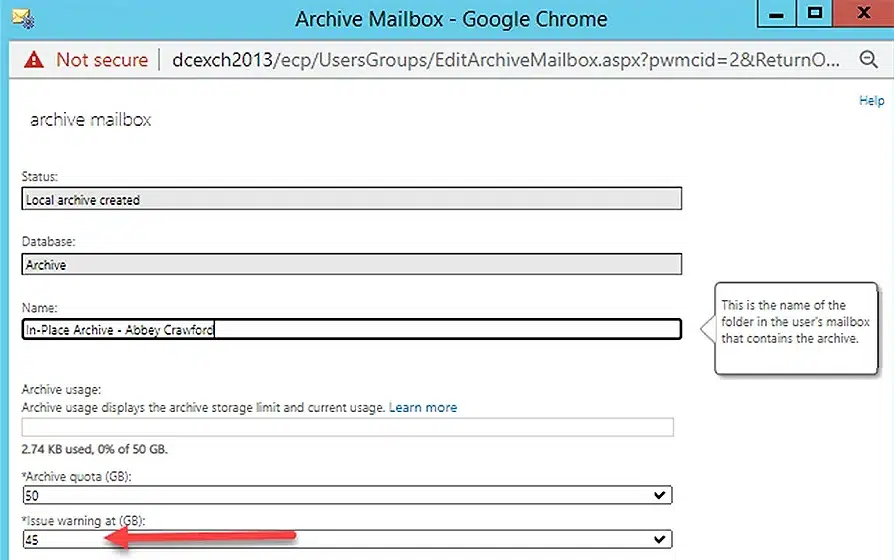
Set an Archive Warning Quota for a Mailbox
To have a user receive a warning message if their archive mailbox is nearing its quota, you can use the -ArchiveWarningQuota parameter to specify a warning threshold. You can use this parameter only with on-premises Exchange Server.
The value of ‘Archive Warning Quota’ must be less than or equal to the value of ‘Archive Quota’. For the value, either specify unlimited or provide a number using one of the following units:
- B (bytes)
- KB (kilobytes)
- MB (megabytes)
- GB (gigabytes)
- TB (terabytes)
Set-Mailbox -Identity “AbbeyCrawford” -ArchiveQuota 45GB
You can check the archive warning quota for a mailbox in its properties:
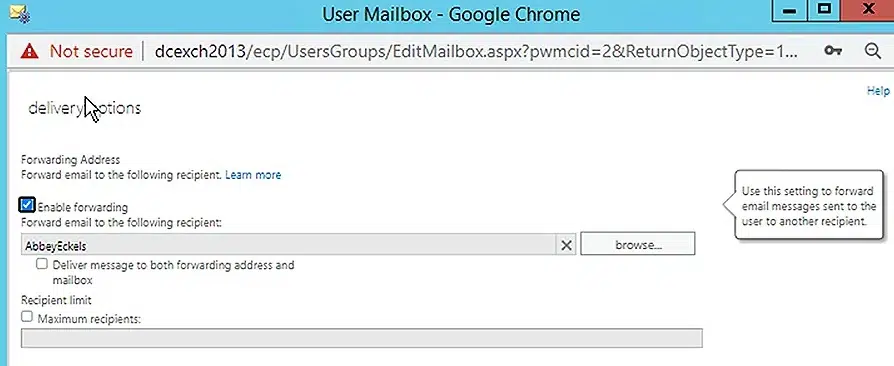
Set an Internal Forwarding Address for a Mailbox
To forward messages sent to a mailbox to a different mailbox in your system, use the -ForwardingAddress parameter. You can use any unique identifier for the other mailbox, such as its: name, alias, Distinguished Name (DN), email address or GUID.
As detailed below, the DeliverToMailBoxAndForward setting controls whether messages are sent to both mailboxes or only the forwarding mailbox.
Set-Mailbox -Identity “AbbeyCrawford” -ForwardingAddress “AbbeyEckels”
You can see the forwarding email address for a mailbox in its properties:
Set an External Forwarding Address for a Mailbox
To forward messages to an external email address, use the -ForwardingSmtpAddress parameter.
Note that if you specify both a ForwardingAddress and a ForwardingSMTPAddress for a given mailbox, messages will be forwarded only to the internal ForwardingAddress.
Also note that the DeliverToMailBoxAndForward setting detailed below controls whether messages are sent to both mailboxes or only the forwarding mailbox.
Set-Mailbox -Identity “AbbeyCrawford” -ForwardingSmtpAddress “test@google.com”
Notice the warning in the figure. As it advises, disable DeliverToMailboxAndForwarding for the mailbox. If you then run the cmdlet again, you will see that your change already took effect.

To check the status of all forwarding options, use the following command:
Get-Mailbox AbbeyCrawford : FL
DeliverToMailboxAndForward,ForwardingAddress,ForwardingSmtpAddress

To further confirm this scenario, you can run the Set-Mailbox cmdlet to set the forwarding address again, and you will see a warning message that the forwarding SMTP address is already in place and will be overwritten.

Control which Mailboxes Forwarded Messages Are Sent to
When a forwarding address (internal or external) is set up for a mailbox, you can control whether messages are sent to both mailboxes or only the forwarding email address using the -DeliverToMailBoxAndForward parameter. It takes a Boolean value:
- $False (default) — Messages are delivered only to the forwarding mailbox, and not to the original mailbox.
- $True — Messages are delivered to both the mailbox and the forwarding mailbox.
The following command will establish a forwarding address for a mailbox and cause messages to be send to both mailboxes:
Set-Mailbox -Identity “AbbeyCrawford” -ForwardingAddress “AbbeyEckels” -DeliverToMailBoxAndForward $True
To see the details of the forwarding settings, use the following cmdlet:
Get-Mailbox AbbeyCrawford | FL DeliverToMailboxAndForward,ForwardingAddress,ForwardingSmtpAddress
Modify Multiple Mailboxes at Once
If you need to change the same property on several mailboxes, first apply a filter to get all the mailbox, and then use the Set-Mailbox cmdlet to edit the mailboxes. For example, here is how we could set up a forwarding address for all employees in the HR department:
Get-AdUser -Filter {department eq 'HR'} | ForEach {Set-Mailbox -Identity $_.Name -DeliverToMailboxAndForward $true -ForwardingAddress "AbbeyCrawford"}As you can see here, running just the first part of the cmdlet will get all users in the HR department:
Get-ADUser -Filter {department eq 'HR'} | ft
With the full cmdlet, the ForEach loop sets up the specified forwarding address (AbbeyCrawford) for the mailbox of each of those HR employees.
Note that the command will not produce any output, but if there are no errors, the changes were applied successfully. You can see them in the Exchange Administration Center.